The Loss of Colour Underwater
When light travels through water, it loses intensity over distance, as it is absorbed by the medium through which it travels, i.e. the water. However, certain parts of the visible light spectrum – the redder parts – are more readily absorbed than others. How come?
The redder parts of the spectrum have longer wavelengths which translate into lower energy, so these are absorbed most readily. Accordingly, the first colour to disappear when light has traveled through around 5 meters is red. This is followed by orange (at ~8m) and yellow (at ~14m). Green is lost at around 23m. What this means in practical terms is that if you were to take a picture below 23m, all that would be left is blue.
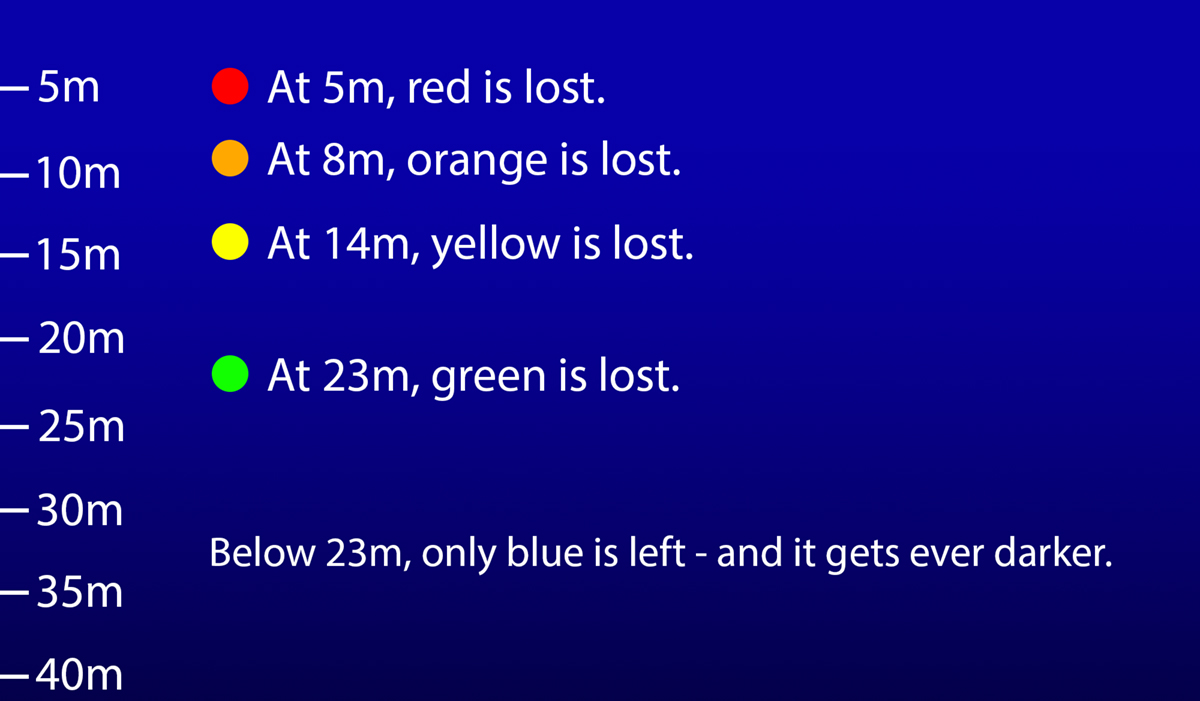
Therefore, everything you shoot below 23m will take on a blue hue, no matter how red it looks above water. And this is a problem. So how do we fix colour?
We shall be looking at two ways we can go about correcting this:
(1) Using colour filters, and
(2) Using an adequate light source.
Ambient light and Practical light
Before going any further we need to distinguish between two different categories of lighting that we encounter in photography. These are concepts that apply to any photographic situation in general (i.e. not just underwater), but we’ll keep our discussion focused on examples specific to underwater scenarios.
Imagine you are carrying no dive lights with you. The existing light illuminating the scene is called ambient light. This is the light that is present already and filling up the scene – the light you would have to work with if you have no other lights available. Ambient light can be anything from very bright to exceedingly dim.
On the other hand, practical light consists of any light that you supply, be it a dive light, a strobe, etc.
In general, we can say that ambient light is the light that will be most abundant in a given scene, while your practical light (which, for simplicity, I’ll call a dive light from now on) will normally be targeted at some particular subject. Put in other words, oftentimes you do not light up an entire scene with your dive light – indeed this can be very hard to do! – but only illuminate a certain subject in your frame. The light in the rest of the scene is merely the ambient light.
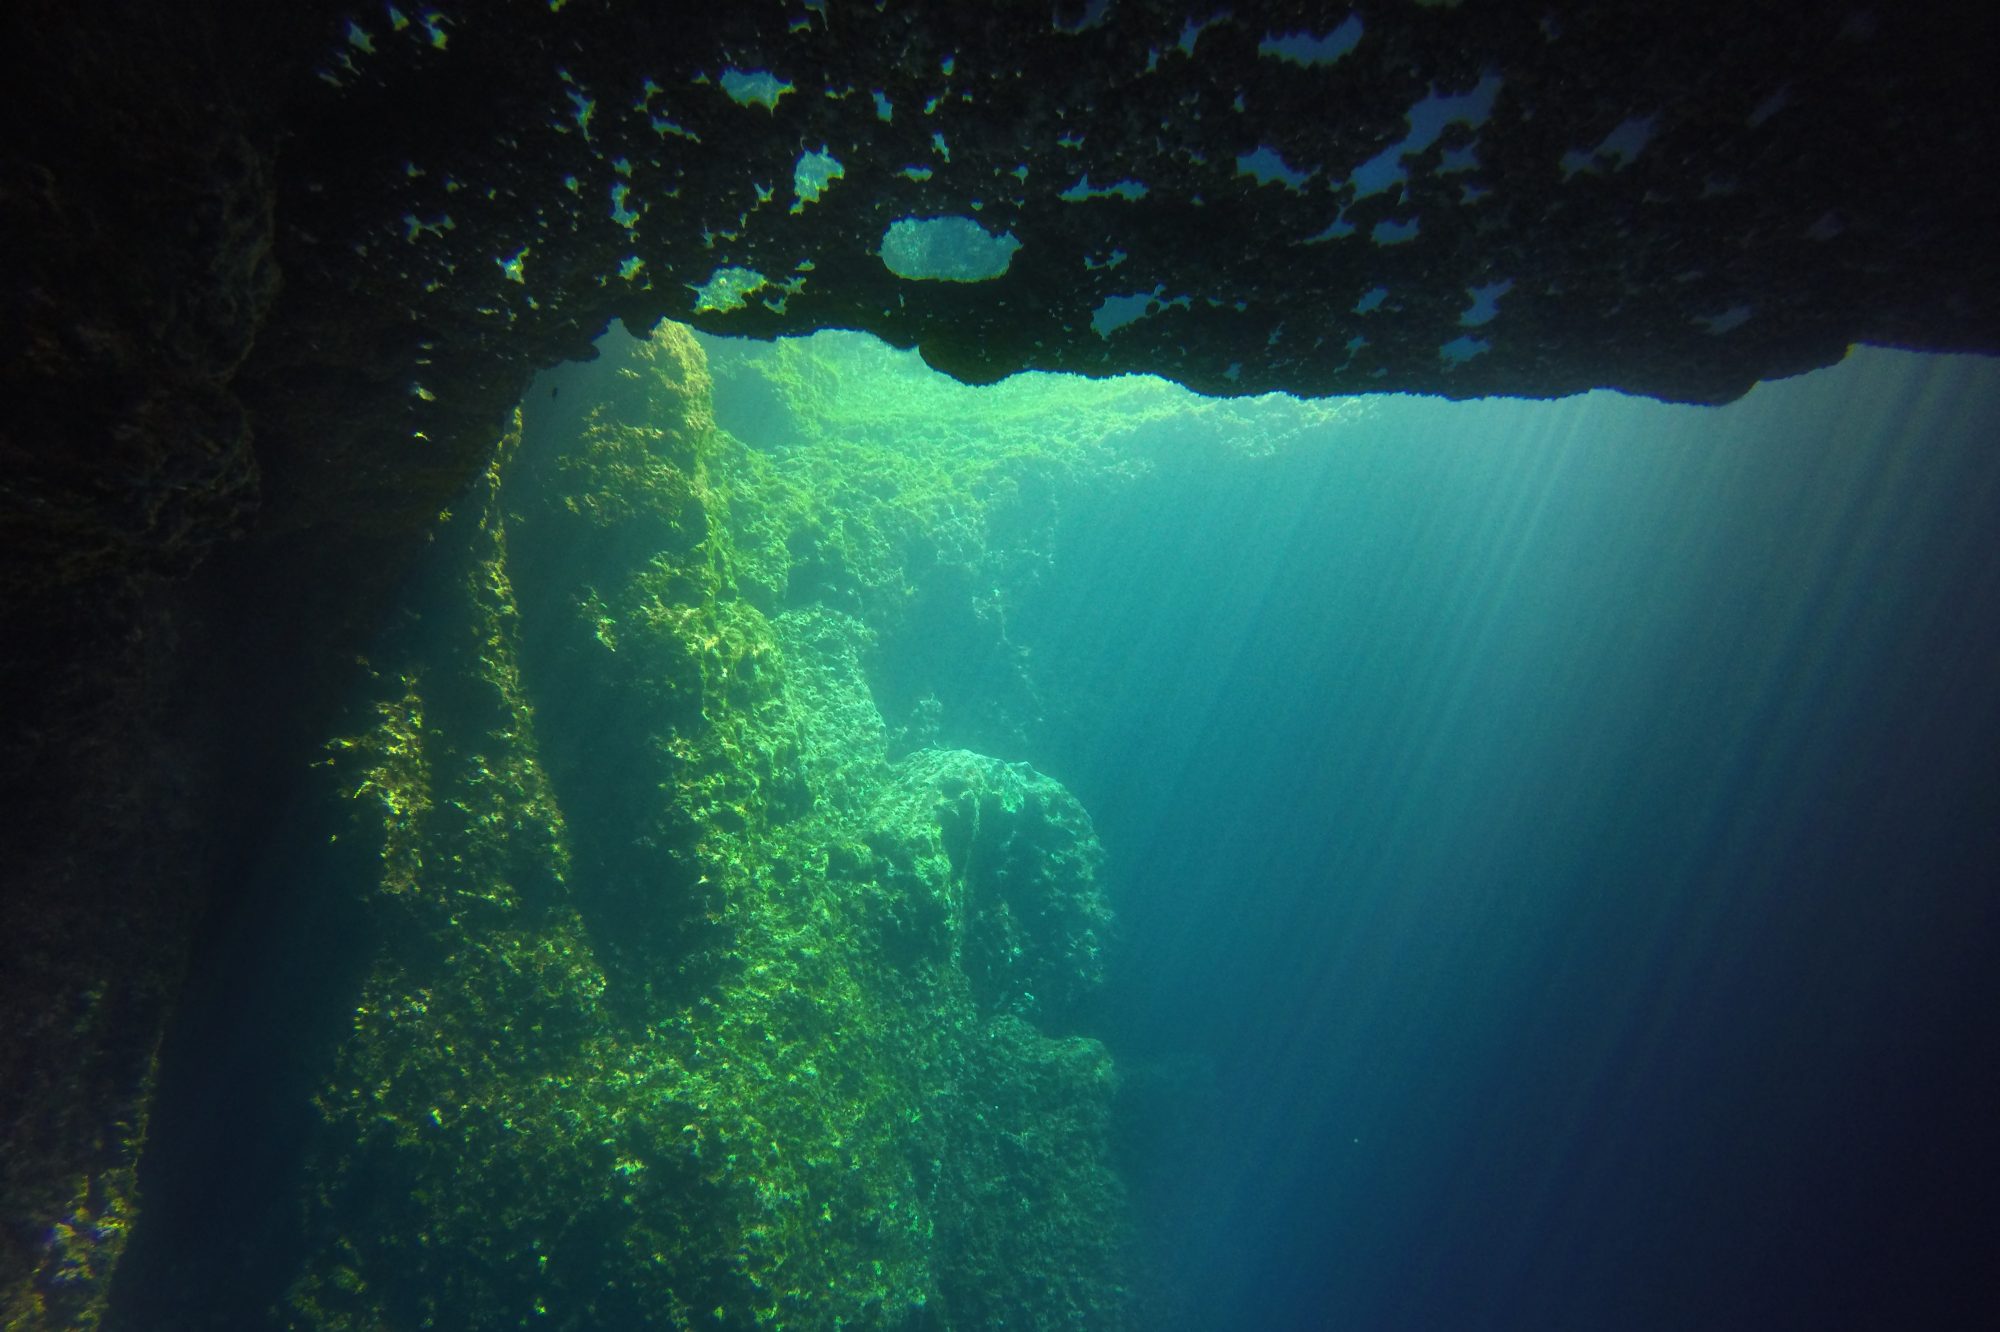
Let us consider the above picture as our first example. This picture below shows a scene that is being entirely lit using ambient (natural) light. There is no additional lighting being provided by any dive lights. The rocks on the left are being illuminated by shafts of sunlight coming in from the top right, and air pockets on the rocky arch at the top are reflecting back some light. Something we can instantly comment about at this point is the fact that, had there been a diver in the bottom right, they would be immersed in darkness (as little light is reaching that part of the scene). If we wanted to have them properly lit, we would have had to shine some light upon them with a dive light or strobe, i.e. we would have had to use a practical light.
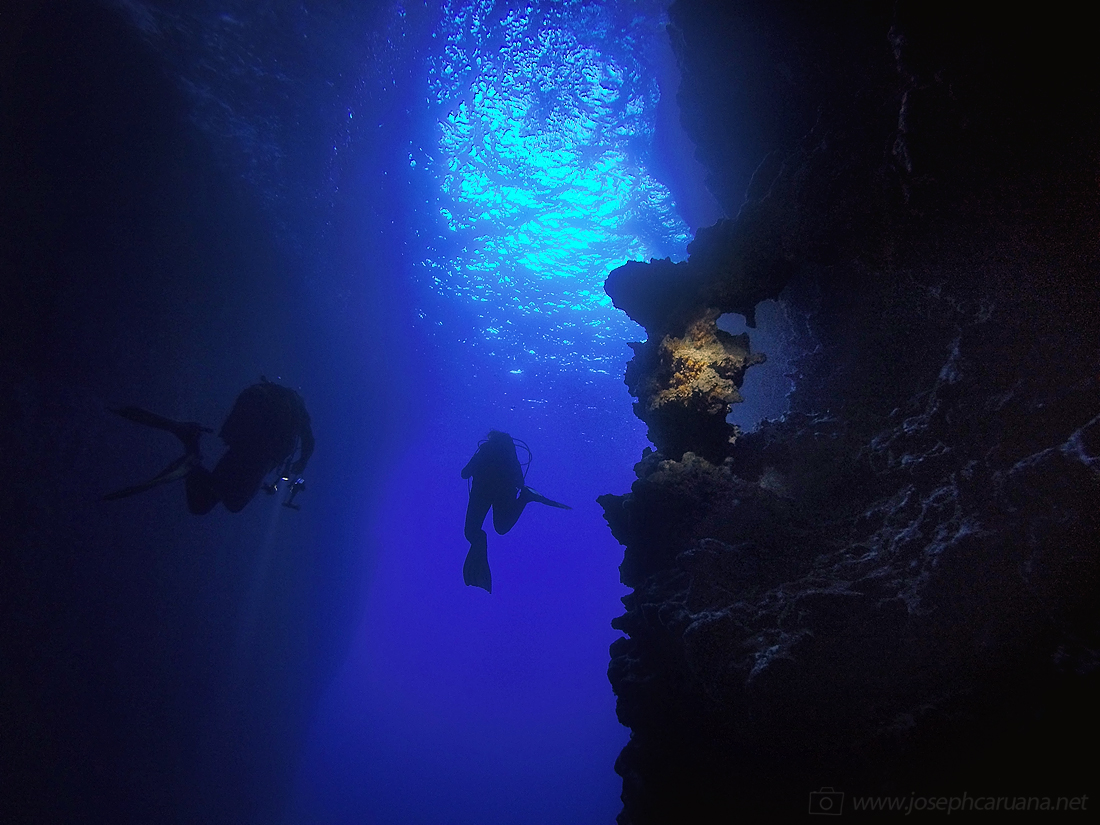
Let us provide another example. In the picture below, notice how most of the scene is being illuminated solely by whatever natural light is seeping through the cave entrance. Admittedly, there is not much light in this case – and a lot of the picture is fairly dark (which is what I had intended). We can say that the ambient light is dim in most of the image (except for the brighter blue in the centre where the sun’s light is shining through). But notice the spot of lighting adding some interest on the rock formation towards the right-hand side of the image. This is a practical light. Had there not been a dive light being pointed in this direction, that entire rock would be as dark as the rest.
As I moved closer to the rock formation, it grew larger in the frame and I took the picture shown below. The arching rock formation now fills a substantial portion of the frame, and I shone a light upon it to lift the shadows as I did not want it to be very dark. Notice two things:
(1) The rock formation is being illuminated by a practical.
(2) The rest of the image is being illuminated by ambient light, in this case whatever natural light is available.
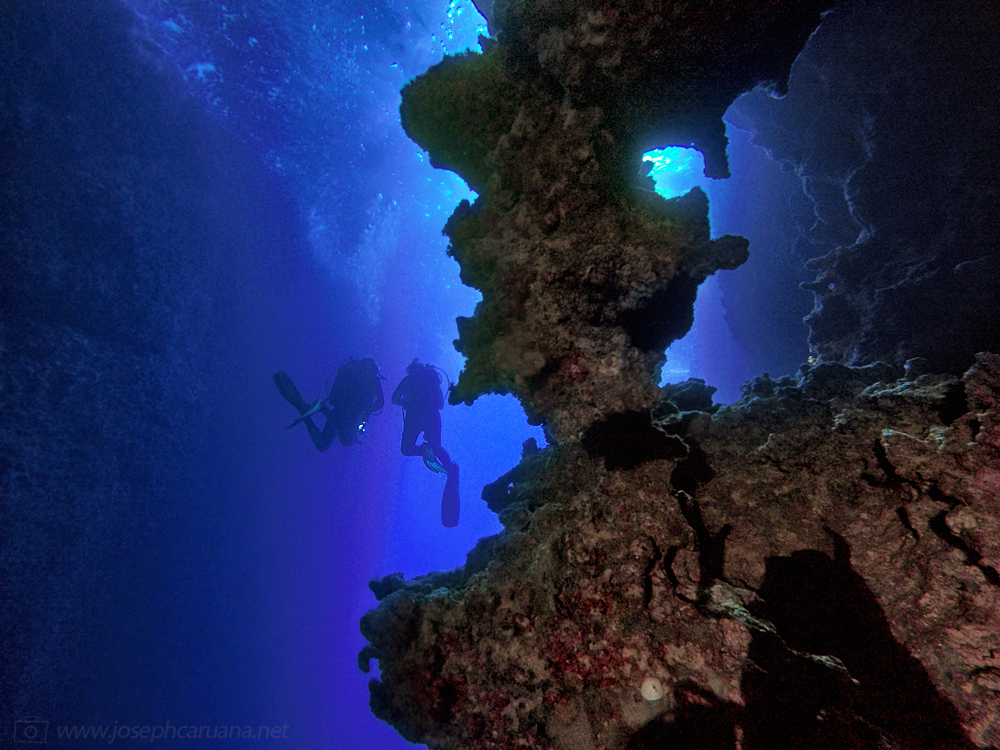
Now, ask yourself this question: what would have happened had I shone the dive light into the blue water at the divers? What difference would it have made? The answer is NO DIFFERENCE. That part of the image is both distant and vastly large – and a dive light would be too feeble to illuminate such a huge expanse of water. The effect of the dive light is very much evident on the rock formation because it is close to the dive light, but the rest of the image would not be affected because it is too distant and too vast to illuminate with such a light.
And this is a key point I wanted to arrive at:
A dive light will mostly affect those parts of the scene that are close to us.
Now that we have covered these points, we can move on to talk about correcting colour.
Using a dive light to bring back colour
Something you might have noticed in the above pictures is that wherever the dive torch’s light happens to fall, colour seems to spring back. You might need to see another example to be convinced. Take a look at the picture below which shows the effect more clearly.
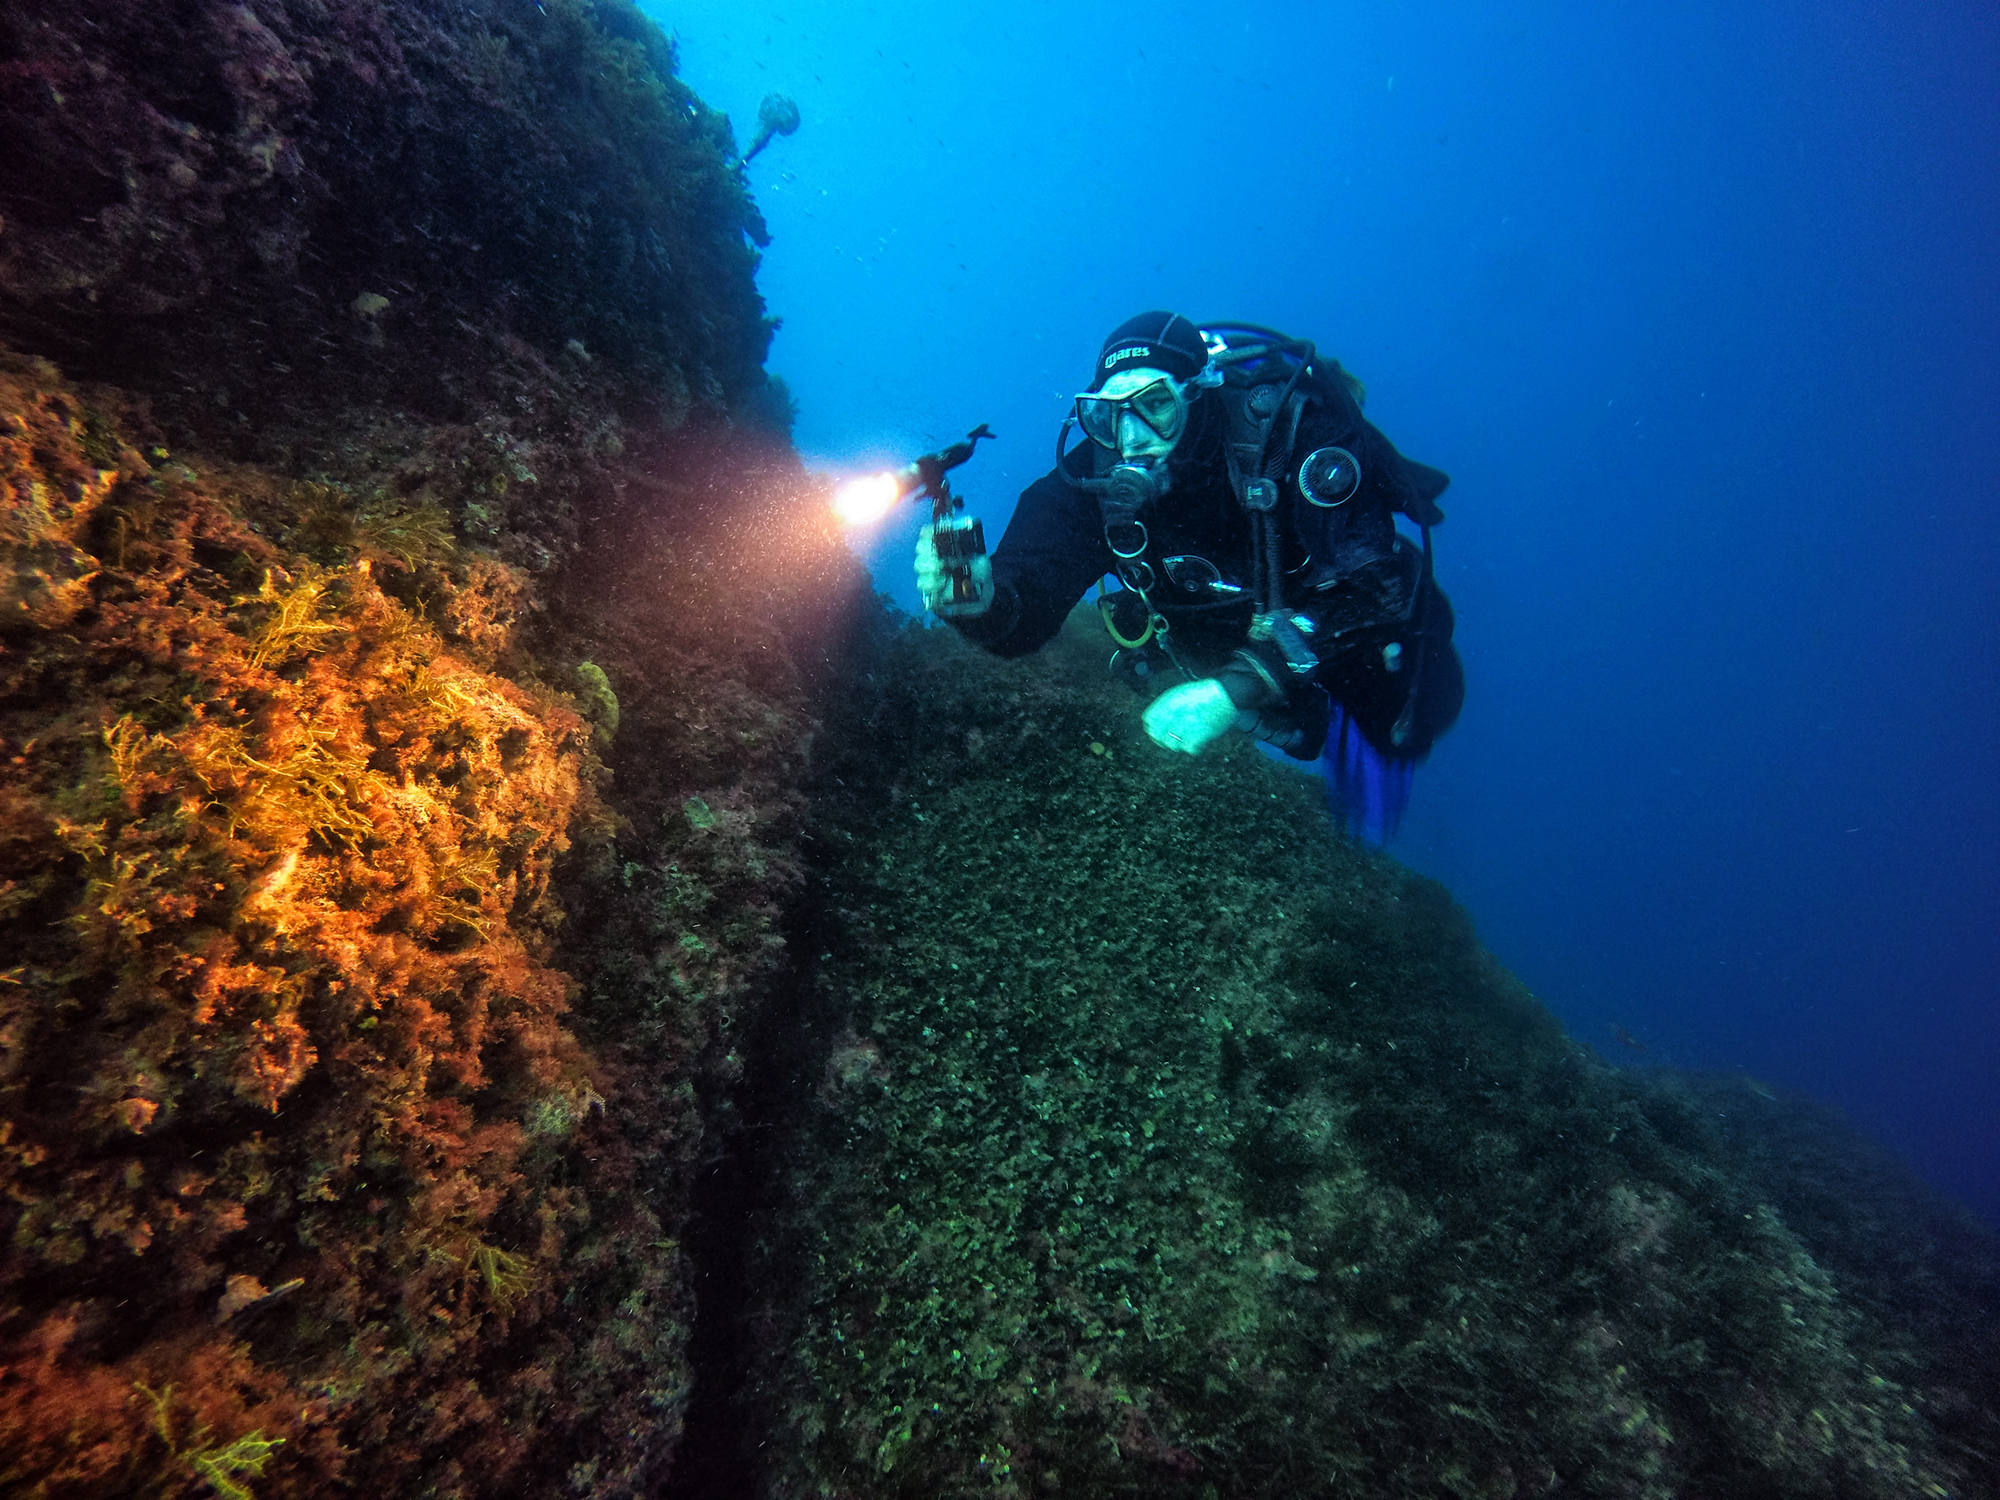
It is very obvious how in those regions upon which the diver’s light shines, the rock takes on a warm yellow-red hue, both of which are colours that are lost in deep water. The ambient light coming all the way from the sun above grows fainter and fainter with depth, with the redder parts of the spectrum suffering most (as we described at the beginning of this article). Therefore, by providing light ourselves, we can retrieve colour at depth.
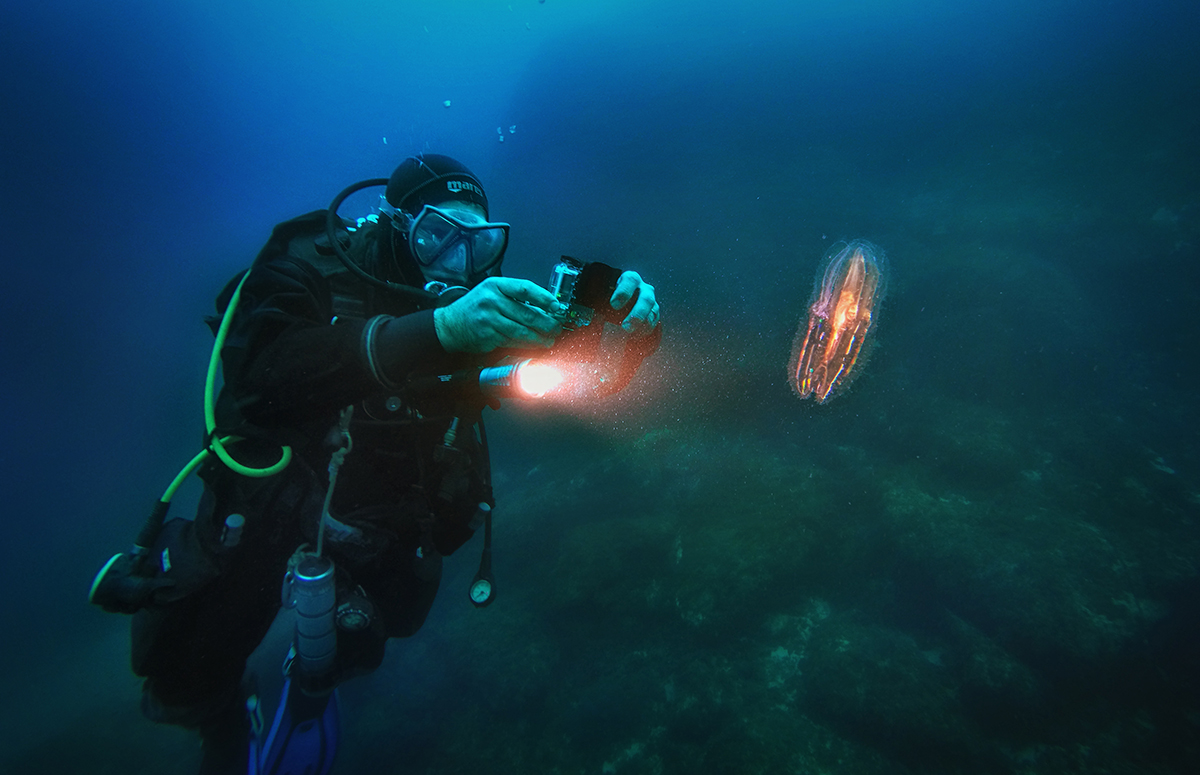
The picture below provides you with another example where you can clearly see this. The scene is mostly blue except for where the diver’s light is shining, thereby retrieving the warmer colours of the spectrum.
Using Colour Filters to bring back colour
Having seen how shining a dive light at a subject instantly brings back the warmer colours, you might rightly be asking: Why not stop there? Why is there another section dedicated to colour filters? Haven’t we found our solution already?
The answer to this question is not “just to provide an alternative”. Do you remember what we said before about practical lights (i.e. a dive light)? A dive light will mostly affect those parts of the scene that are close to us. This means that while you can retrieve the colour of those objects that are in your vicinity by shining a light upon them, you can’t hope to do the same with the entire scene. You can’t light up the ocean, so to speak. Your dive light, even if a powerful one, will not be able to illuminate far away. And therefore the rest of the scene will stay blue. Now that is not always wrong in itself. For example, that works perfectly with the picture above that shows a diver investigating a comb jellyfish. The blue tones provide contrast with the glowing jellyfish and that helps it stand out better as the subject of our photo. However, there are situations where you would like to bring back colour to an entire scene as opposed to just a single element within it. That is where colour filters come in helpful… very helpful, in fact.
You will find filters manufactured for the GoPro by various manufacturers, such as Backscatter, PolarPro and GoPro themselves. The general idea is pretty simple. At depth we lose a lot of the redder parts of the spectrum, so we use a red filter to shift the colour of the scene back towards the red. However, since the level to which red is absorbed varies with depth, you will often find filters tailored for a particular depth range, such as with Backscatter’s filters, for instance (see picture below). These come in three different versions, the first one suited for shallow dives between 5 and 20 feet (~1.5m-6m), the second optimized for deeper dives ranging between 20 and 50 feet (~6m-15m) and the third for even deeper dives below 50 feet (15m).

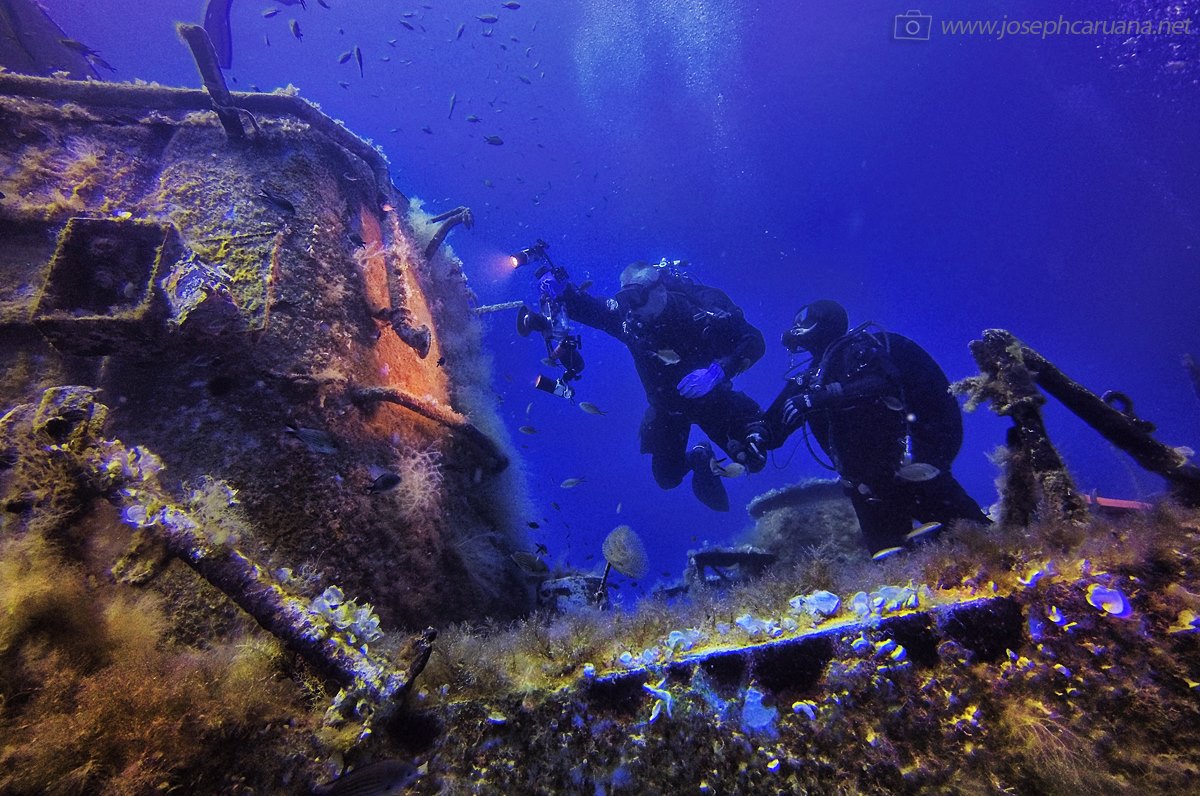
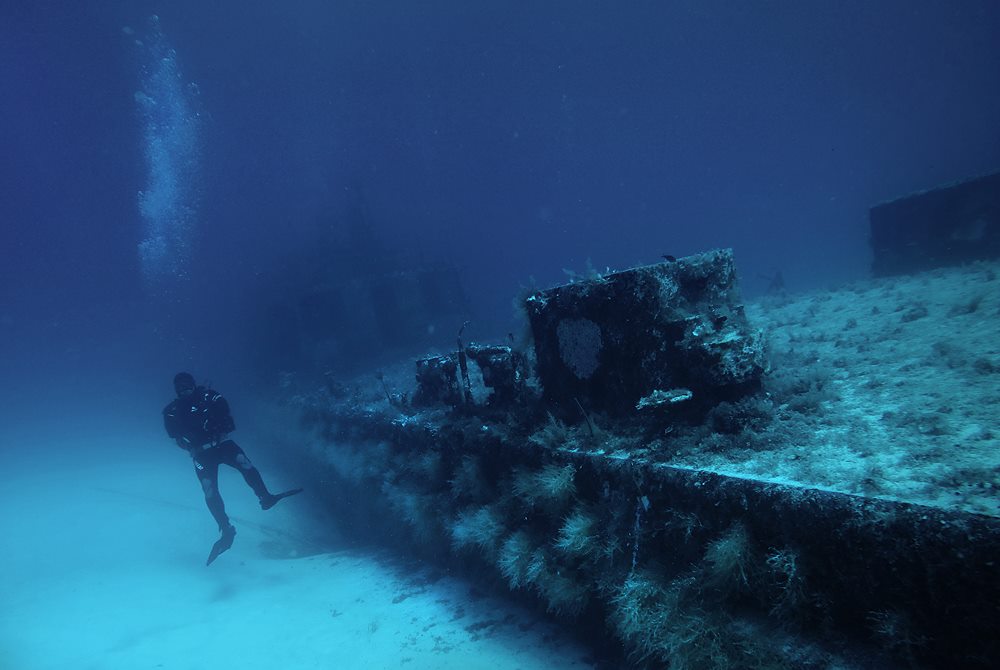
An example of one of these filters in use is the picture below, which shows a wreck sitting on a sandy, 18-meter-deep bottom. In this particular instance, I used the Deep filter from Backscatter (suited for 15m+). You can see how despite there being no dive lights shining upon any of the camera-facing structures (i.e. note that I’m not talking about the part where there is a diver shining a light), we can still discern colour in the various vegetation thriving on the wreck. Without a red filter in place, this would appear as a bland swath of blue-green, like what you can see in the second picture below of the same wreck (that was indeed taken without a filter).
Ok, and here is what the same wreck looks like when we do not use a red colour filter.
Now mind you, filters are to be used judiciously. Sometimes you might prefer not to retrieve warm colours at all, perhaps for reasons that have to do with creating a darker, colder atmosphere. Indeed, you can see how the above image still works, but in a different way to the one above it. So keep in mind that while you do have an option to get the reds and oranges back, you don’t always have to get them back.
Furthermore, don’t forget that the deeper you’re diving, the darker it gets, and putting a filter in front of the lens will darken the scene even further. Below a certain depth, one really needs powerful lights to illuminate as far as possible – accepting that at great depth, dark blue is the winner.
One last point: what happens if you were to use a red filter in combination with a dive light. Well, you can get an idea from the first wreck picture above. Look at where the diver is lighting up a portion of the wreck with his dive light. See how intensely orange-red it looks (especially compared to the rest of the image)? That’s because the diver’s lights are recovering the redder parts of the spectrum already, but then on top of that I’m using a red filter on my camera, which renders those reds even redder. It’s not a major issue in this specific photo as the lit-up part of the wreck occupies little space in this picture – and the dash of bright orange-red actually draws our eye to the focal point of the image (which was my intention to begin with). However, if we were in the position of that diver using that dive light to take some close-up photo, we certainly would not want to be using the red filter, or our image would be awash with red rather than depicting colours correctly.
So that is all for today folks. I hope this article helped you in understanding better how you can control colour in your GoPro images – and in underwater pictures in general.
Until next time, happy & safe diving to all!
Tempting me to take my land-based photography skills down below. I find the prospect a tad daunting, I am not really prepared to risk high-end DSLR equipment in any underwater housing, so might need to invest in a standalone system.
Equipment, including camera housings, has come a long way. However, I can’t really fault you for being wary; for a long time I was a quite apprehensive about plunging a top-range SLR and a matching lens underwater. However, these days I’m warming to the idea… which is quite bad in a way, because the fear was at least keeping me away from shelling out any more money on equipment! 🙂