The making of an image: some tips & tricks
Many of you were interested in my last post, particularly with regards to the process that led to the resulting image. Given the curiosity and the fact that it’s been a while since the last time I shared a few thoughts about the process that goes into creating an image, I thought I’d take some time to write a post to share some tips. Some of these are fairly general while others are more specific to this particular image, but all are quite useful to keep in mind. So without any further ado, here they go.
Preparation and Scouting
Preparation is key. Whenever possible, make sure you know the location. In my opinion, the following two points constitute good practice:
- If you have the opportunity, go and scout the location for interesting viewpoints in advance. If it’s a cloudy/overcast day with no prospects for photography, it’s (arguably) even better as you won’t be distracted by the urge to take pictures; instead, you will be able to calmly focus on exploring different angles and perspectives without feeling guilty that you are wasting opportunities by walking around instead of snapping away.
- Take a notebook with you and write down the important details. For example, visualise in your mind what a scene will look like when the sun will occupy a certain position in the sky. How do you expect the light to fall upon the surrounding landscape? What will lie in direct sunlight, and what will end up falling into shadow? Is it best to revisit the location in the morning or at sunset? Would a windy day be better or worse than calm weather? Can the sun be positioned in a strategic position in your frame to complement a particular element of the scene you are considering? (In my image of Dwejra, for example, this was clearly the case.) On a more technical side, what are the risks of flare making its way into your image? If it’s unavoidable, can you perhaps implement it in a creative way? Anything that’s useful should go into your notebook so that you can revisit the scene at a later point.
Read the sky and arrive early
Let us say that you are hoping to shoot a sunset. If the weather looks good, then make sure you arrive on site in good time. Below are some of what I consider to be clear signs that an evening is promising (and that I should therefore clear some time for photography):
- The sky is not completely overcast and uninteresting. (This one is obvious enough.)
- The horizon is not covered in a swathe of impenetrable thick clouds. All too often, the sky on the whole is fairly clear, but the horizon is not. This can be deadly for your plans; if sunlight is blocked right at the horizon, the resulting sunset can be quite dull.) Check the wind direction and see whether it is bringing up clouds from (towards) the direction where the sun will be setting (rising).
- There are some nice broken clouds that can add interest; a completely clear sky can be boring. Also, gaps between clouds can allow beams of sunlight to pass through, sometimes resulting in crepuscular rays.
- There’s a light breeze or wind that might usefully add movement to your image (in clouds and/or water), making for a nice effect during longer exposure times.
If prospects look good, get there in good time, at least half an hour in advance, to allow yourself sufficient time to set up your kit (tripod, camera, etc.) and fine-tune your composition, which is our next consideration.
Composition
As with light, composition can make or break your image. Composition has many facets, but here I will focus on just four important aspects:
- The choice of lens
- The foreground interest of the scene
- The chosen Perspective
- The familiar rule of thirds
Let us have a look at each of these, one at a time.
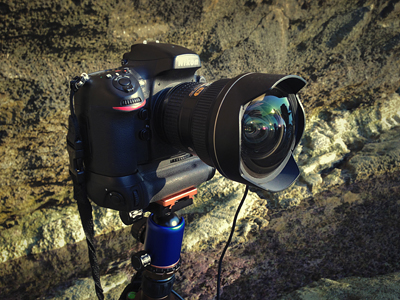
Choice of Lens: Wide-angle or telephoto? A wide-angle lens is the most common type of lens used for landscape photography, although telephoto lenses can be very useful for certain scenes and come into their own when you want to compress perspective. (I’ll have more to say on this in a separate article.) On the other hand, an image taken with a wide-angle lens helps to (1) immerse the viewer in the scene and (2) thwart/exaggerate perspective; things that are close to your lens will look huge with respect to elements which lie further away.
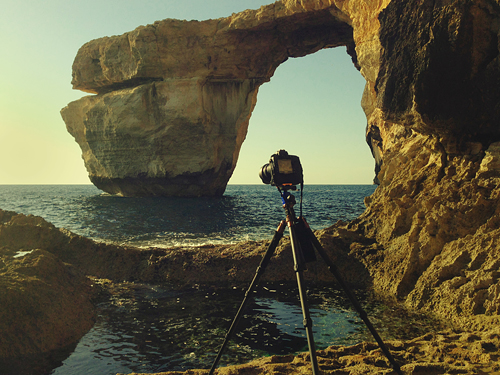
Foreground Interest: An image often consists of two main parts: the foreground and the background. One of your aims as a photographer is to create depth in your photograph. Your choice of composition should lead the eye into the image, all the while keeping the viewer interested. By ensuring that the foreground of your image has something interesting (be it a structure, pattern or a key element) you can separate the foreground from the background while seamlessly leading the former into the latter. Move around keeping your eyes glued to the viewfinder of your camera (careful you don’t trip or fall!) until your image looks interesting enough. By way of example, have a look at the two pictures below. In the first photo, you can see the camera set up quite close to the edge. However, with the camera set up here, I wasn’t quite happy with the foreground I was getting.
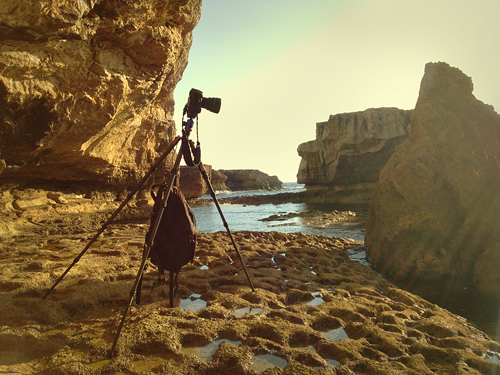
So I detached the camera from the tripod, took a few steps backwards (landing myself in a relatively deep pond in the process – I told you, keep an eye on your surroundings!) and assessed the scene again through the camera viewfinder. Lugging your camera around while it is still attached to a tripod is cumbersome and tiring, so I suggest moving about freely, camera in hand, until you’re happy. Once you know where you want the camera to be, make a mental note of some of the elements located in the corners of your frame so that you can quickly recompose later – and then set up the camera on the tripod and fine-tune your composition. You can see in the picture below how I’ve included more ground in front of my camera now. This would eventually be incorporated as foreground interest. (In the end, I actually set up the camera further back from this position.) Also, note that I have attached the (fairly heavy) camera bag to the tripod’s central column; that way I have a more stable platform.
Perspective: The perspective will be determined by three key choices you make: (1) the lens you choose as highlighted earlier, (2) the height at which you set up your camera and (3) the angle of your camera. For example, for my image (which I took using a wide-angle lens), I experimented with the camera being set up closer to the ground as well as at a higher position until I was content. Also, note that the angle of the camera in this instance is such that it is tilting downwards, precisely because I wanted to get more of the foreground visible (from an elevated angle). Sometimes you’ll want to be lower to the ground. It all depends on the scene and what you’re shooting.
Rule of Thirds: The rule of thirds is one of the most commonly known guidelines to good composition – and it is a very simple rule at that. Simply imagine two horizontal lines and two vertical lines running across your image such that it is divided into 9 equal parts (see figure below). It is pleasing to the eye to place an interesting element roughly at the intersection of any two of these lines. In the case of my picture, for instance, I placed the pointy rock and sun close to the upper left intersection and the arch close to the intersection in the upper right. Also, the horizon should run along one of the horizontal lines (rather than being placed smack in the centre); whether it is the bottom line or the top line depends on whether you want to include more sky or more ground. However, as always, rules are there to be broken, and indeed the rule of thirds can sometimes be purposefully ignored to good effect. But you have to know the rules first in order for you to break them. In any case, the rule of thirds is a very effective “rule”, so do keep it in mind.
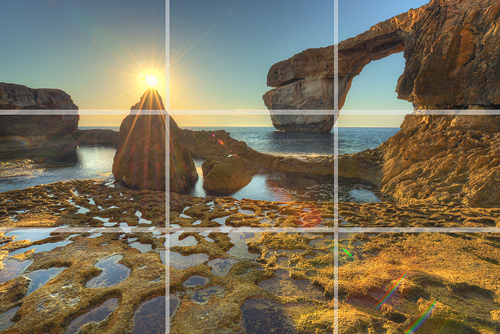
By the way, see how the ground interspersed with reflecting water has made for a nice foreground full of interesting structure?
Light
Light and its properties will either bring your image to life or consign it to boring darkness. There are 3 aspects to light in photography:
- Colour
- Quality (soft & wrapping vs hard & directional)
- Direction
Colour: Colours can be broadly classified into two categories: warm and cold. The red/orange colour of sunset is a warm colour that often elicits strong emotions in the viewer. It is for this reason that I waited for a couple of hours until the sun was lower in the sky, as this added vivid colour and brought the landscape to life. In principle, in order for the sun to appear right above the pointy rock, I could have simply lowered the camera’s position (as this would have made the rock appear higher with respect to the horizon and the sky), snapped the picture earlier and saved myself two hours. But the colour would have been much cooler (i.e. blueish), not to mention that I would have compromised the foreground interest which I talked about earlier. So I played the waiting game.
Quality: Soft light provides smooth, even illumination that wraps around the subject and does not create strong shadows; for this reason, this is the preferred lighting for portraits. However, in landscape photography, often (but not always) we want directional light coming from a distant source (i.e. the sun) to create relief in the rock/ground and provide contrast in our image.
Direction: Do you want the sun to illuminate the scene from behind the camera, from the side or directly in front? How low in the sky do you want it? (The lower it is, the warmer the colour and the longer the shadows.) Keep in mind that if the sun is close to the corner of your field of view (i.e. close to the corner of your frame) or shining directly upon your lens, then you will most likely get lens flare, most especially with wide-angle lenses.
So, for example, in the case of the Dwejra photograph (around which I moulded this discussion), we can say that we have warm, fairly hard, directional light from the front.
Dynamic Range
How large is the difference between the brightest elements (called “highlights”) and darkest elements (shadows) of your scene? If there is a very wide latitude in brightness levels, then the camera might have a problem to register the whole brightness spectrum since it can only cover a certain range of brightness levels, which is known as the dynamic range of the camera. (In general, more expensive cameras tend to have better sensors which can cope with a wider range of brightness levels.) Because of this limitation, you might end up either (1) exposing correctly for the highlights but underexposing the shadows, or (2) exposing correctly for the shadows but overexposing the highlights. When you are confronted by such a problem (i.e. you are not able to make an exposure that correctly records both highlights and shadows), you will need to take a number of images with different exposure times and merge them later in post to create what is known as a High Dynamic Range (HDR) Image, such as in the case of the Dwejra photograph.
And there it goes, folks. I hope that you found some of the above information useful. Until next time, happy shooting!